Knowing your eye shape will help you apply makeup effectively. Making the best of your eye shape is as important as your color choices. The placement of your shadows and liners can make or break your eye shadow look.
Eye contouring is using makeup to change or enhance your natural eye shape and, if you have downturned, monolid, or small eyes, this will be your new favorite beauty hack. You’ll learn how to contour your eyes and look more fabulous!
Check out our infographic below:
Almond Eyes – This is considered to be the most balanced of eye shape, meaning the lid, socket and brow bone are proportioned. With this shape, you can wear any style and play with placement of colors.
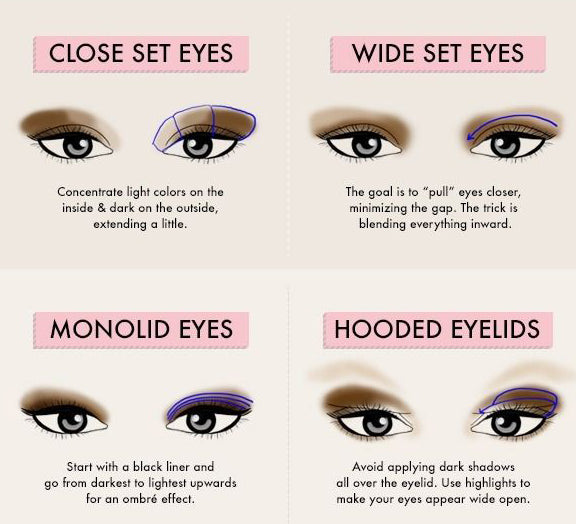
Wide Set Eyes – As a general rule, the width between your eyes should be approximately one eye – if it’s more, you have wide set eyes. When it comes color placement, to balance the face, apply a medium tone to the inner corner and work out across the lid, which will make the eyes appear to be closer together. If you put a lighter color in the inner corner of the eye, you will end up making it appear that your eyes are even wider apart.
Close Set Eyes – As mentioned above, using the “one eye apart” rule, if you have less than an “eye width” you have close set eyes. In this case, if you add dark color to the inner eye, your will make your eyes look even closer together. You need to add light colors to the inner eye and darker to the outer eye – this will give the appearance of a balanced eye shape.
Round Eyes – This, has a very similar shape to almond eyes, but the eyeball itself is more pronounced. For this shape, you can do anything on the top (lid, crease etc.) but I would avoid using any liner on the bottom of the eye as this tends to exaggerate the roundness.
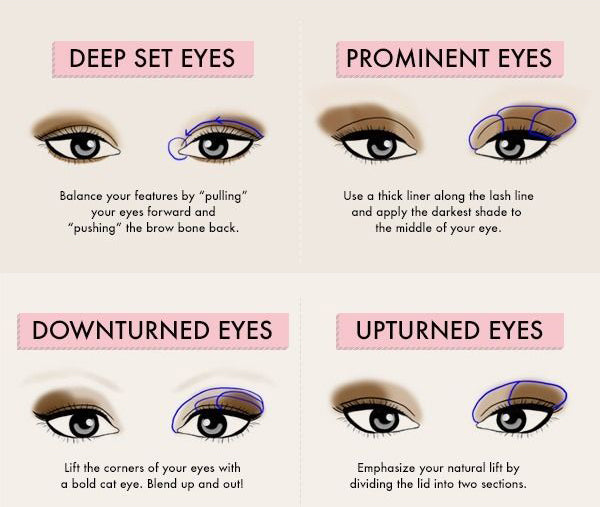
Downturned Eyes – This shape tends to have a “droopy” look to the end – to pull the eye up, make sure any liner or color you use is drawn upward from the outer corner of the eye. You can do this with the tip of a triangle sponge – after application, take the sponge and from the outer corner, just swoop upward and you will see an instant lift to the eye.
Upturned Eyes – This shape is obviously the opposite of the downturned eye, so for this shape, avoid liner that sweeps up as that will exaggerate the upturn. Rounding out and blending the outer corner will give a more balanced look. Use dark eyeshadow on the lower outer corner of the eyes. That will instantly lower down the eyes and help balance out the shape. On the lids, use a medium eyeshadow. You can use the same eyeshadow along your lower lash line. Don’t forget to highlight the brow bone.
Prominent Eyes – Some refer to this shape as “bulging” but really, it is simply that the lid is pronounced with a rather deep socket. Applying light to the lid and dark in the crease will only enhance the shape – remember light brings forward and dark recedes. For this shape, you will love your results if you apply a medium to dark tone on the lid only, with a lighter tone in the crease.
Big Eyes – This shape works best with medium tones swept around the entire eye – follow around the lash line both above and below and add a bit of dark shadow to the outer corners for a smokey look.
Deep Set – This shape is not like prominent shapes eyes – with this shape, you have a deep socket with a balanced lid – but the principle of application is the same. You want to avoid using dark colors in the crease as this will only add the deepness of your socket. Instead, add medium tones from lid into crease.
Small Eyes – With this shape, I avoid lining the entire eye with a dark liner or color as this only closes the eye more. Light to medium color around the entire eye, and line only the top lid.
Hooded Eyes – This is when the skin of the crease falls over the lid, covering most of it. I have this shape. I find most people try to minimize the “hood” by applying a dark color in the crease – BUT this doesn’t really work as hooded eyes don’t have a pronounced crease. The balance of your eyes and face will look best if you apply a darker neutral color on the lid to within ½ inch to the brow and smudge up. Then apply highlight on the frontal bone. Adding a bit of a highlight to the inner corner will open the eye. Then lots of mascara! It’s also a good idea to keep your brows well-groomed all the time so that you’ll have enough space to work with.
Leave a comment (all fields required)